Showing posts with label solwise. Show all posts

Product Review – Solwise Patriot 4G Outdoor Antenna

For some, camping – however you do it, be it under canvas or in a caravan or motorhome, is all about getting away from it all. Others though – us included, do like to stay connected when travelling.

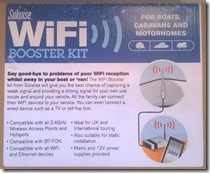
Mostly – for us anyway -  that is by using the on site WiFi, made easier by our Solwise WiFi booster kit which I reviewed last year. You can read that review HERE.

There’s been occasions though when WiFi hasn’t been an option, either because the site didn’t have any or there was nothing available nearby – like BT WiFi for example. Smaller sites, Cl’s and CS’s for example often don’t offer WiFi so the only other way of staying connected is through the mobile phone network – say by using your phone’s hotspot facility or a dedicated mobile WiFi device. We’ve used both many times but they do suffer from the same problem if the signal is weak as they’re located inside the ‘van – and at least partially shielded by the walls.

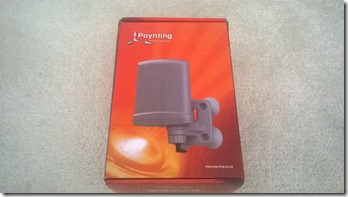
Solwise have now released a new product which they’ve very kindly given me one of to play with that is positioned outside, like the aerial in the WiFi kit mentioned earlier. Lets take a look.

20180223_134718

At first glance it looks similar to USB WiFi antenna in the kit mentioned above and will handily fit in the same bracket. A standard sized SIM card form you network of choice slots in the bottom of the unit alongside the connector for the supplied USB lead.

The cable entry point ensures a good water resistance seal however it’s quite tight when first pushing the lead through. A quick wipe with something like a shoe shine sponge (not polish!) or similar silicon based product will help it on it’s way.

20180226_13451520180226_134605


The unit can be used on it’s own with any Windows PC from 7 upwards with a USB socket, however it also pairs with the mini WiFi router/repeater that forms part of the kit mentioned at the start. We’ll take a look at both, the solo option first.

With the SIM card in place and connection sound at the antenna end, plug the lead into an available socket on your device. On Windows 10 devices it appears as an additional drive in explorer. Click on the drive then double click on Setup to start the installation of the software. There is no physical CD to worry about

SOL01SOL02

Follow the on screen instructions – I accepted all the default options with no issues. on launching the program this is what you will see. The screenshot on the right shows how the device appear in your network settings.

SOL03SOL04

Click connect. If the SIM requires a top-up or data to be added a web page from your chosen network should open. Top up or add package as required depending on the operator. For pre-paid SIM’s or those that already have data loaded you should now be on line and can surf away. No further set up details were required when I used it with EE and the others should be the same. Basic details, such as operator and data sent and received is shown at the front.

Right, now lets take a look at using the device with the Solwise router/repeater that forms part of the WiFi kit. This method will likely be of more interest to those that already have said kit. You will need the APN settings for your chosen network, and Solwise have a list HERE.There is also an important update that needs to be applied to the router first though. Here we go.

The router’s Firmware needs to be updated so it can work with the 4G antenna. It’s easy enough to do and only has do be one once but must be done right. The router will need to be physically connected to your computer with a network cable to do this. make sure you use the LAN socket on the router. This is the one next to the power socket. Do not plug in the antenna at this stage.

Open a web browser and access the router’s control panel by typing 192.168.2.1 into the address bar, or 192.168.50.1 if you have made the adjustment to work with BT WiFi. Enter your password.

SOL05Go to the Advanced tab then click on Management, then look on the right hand side under Firmware Upgrade. If the Software Version says anything other than so-2.33 then you need to upgrade the firmware. Don’t worry, it’s straightforward.

The Firmware upgrade file you need can be found on the Downloads Tab on the Solwise website HERE Click and save to your computer. I usually save to the desktop so I can find things easily!SOL07

Back on the router control panel click on Browse to locate the file then click on upload. The upgrade only takes a few minutes. Once the browser window goes blank re-enter the routers address and go back to check that the correct software version is shown.

Right, now the router is ready to use with the 4G antenna. Lets see how.

Log into the router’s control panel as before but this time select Easy Setup, then 3G/4G dongle. You will be presented with this

SOL15

Enter the settings according to the list from Solwise as mentioned. I’m using EE in this case so have entered ‘everywhere’ in the APN Service box and cleared all other boxes. Then click next. I accepted the message about disabled budget control.

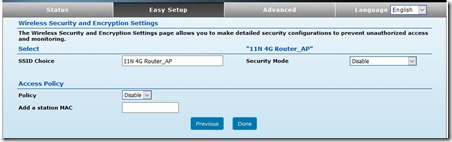
You will then be presented with this screen for renaming and securing your WiFi signal. If you have used the router with the WiFi aerial previously, you should have already done this and can leave the settings the same. If not I strongly urged you to at least add a password so no one else can use your valuable data without your permission.
SOL17

Click done and next the router will reboot – this will take a few minutes, so time to put the kettle on. It may appear to ‘hang’ on 100%. Don’t worry, your computer will disconnect as the router reboots and if you’re doing this at home, it may have reconnected to your home WiFi. Just reselect the mobile router if your computer doesn’t reconnect to the router automatically.

SOL20SOL21

You should then get a message indicating success. Click on OK then, depending on your browser another tab will open from your chosen network for you to top up or add a data package. Again, for pre-paid SIM’s or those that already have data loaded you should now be on line and can surf away.

So, that was the how. But what about the why? What are the advantages of using this over a mobile WiFi dongle or ‘phone hotspot? They can both share to multiple devices right?

Yes, however due to the fact that this device sits higher up and outside your ‘van it is much more adept at picking up mobile signals in areas with poor coverage – and there are plenty of those about as anybody who travels a lot will already know. Like the WiFi version it has a 5dB omnidirectional antenna so no fiddling with direction is required.

For those that mostly visit club sites with WiFi this may not appear to be of much use however in my experience site WiFi can be pretty slow and if you need the speed that a good 4G signal can bring then this will help. As I’ve said I think it will be of most interest to those that already have the WiFi kit – this makes a handy addition for those that need to be connected whenever and wherever they are travelling.

It’s available for a little over seventy quid and can be found on the Solwise website HERE

If you have any questions please don’t hesitate to send me a message though the blog or one of our social media channels or give Solwise a call on 01482 672872. They’ll be happy to help.


Product Review – Solwise WiFi Directional Antennae

As mentioned in my blog post back in June, this summer we’ve had the opportunity to evaluate two more products from the good folk at Solwise, namely outdoor antennae to extend and and enhance WiFi reception when on site. Those who follow our exploits on Facebook and Twitter will have already seen who we got on but I’d like to go into a little more detail about how they work in practice.

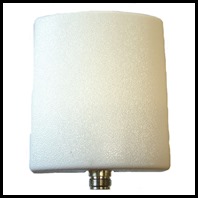
First up is the Outdoor Panel Antenna. This will be of most interest to those that alreadynet-wl-ant010pn-1 have the Patriot/3000 WiFi kit that I reviewed back in April. This directional antenna simply screws into place instead of the supplied omnidirectional antenna using the ‘N’ connector on the bottom. It has a gain of 10dBi as opposed to 5dBi. To get the best signal and the curved front needs to be facing the source, so a look around the site may be of help here. Alternatively point it towards a property where there may be another source of WiFi, perhaps a nearby pub, farmhouse or office perhaps. Once it’s aimed in roughly the right direction you will need to adjust it to get the best signal and this is where a pad/tablet pc or large screen phone is handy. You’ll see why below.

Log into the router software in the usual way and click on Change Profile. Those who already have used the kit with the standard antenna will be familiar with these steps.

Then click on Site Survey – this will bring up a list of all available access points. Look for the one you are wanting to connect to and note the figures in the Signal column,then adjust the antenna slightly one way or another, by holding the knurled ring and rotating the antenna, re-tightening afterwards.

Click on Site Survey again. You are looking to increase the score out of 100 (**/100) for the signal quality and lower the figure for strength (-**dBm) If you see an improvement in the figures then you’re heading in the right direction. I’ve found that you can usually achieve the best available signal in three or four goes. Once you are happy Select and Save as required. Log in to the service provider in the usual way you would with the standard aerial.

20170725_084112Ok, so it’s not as straightforward as using the omnidirectional antenna but is it worth the extra effort and cost? Well, having tried it extensively over the summer I would undoubtedly say yes. Two of the sites we stayed on had no dedicated site WiFi yet with this we were able IMG_20170714_121544to pick up BT WiFi from the farmhouse/office and as BT customers – for our sins – that was ‘free’. The only alternative would have been costly mobile data – and the amount we get through thanks to our social media presence – that would have been very costly indeed. At a little over twenty quid as caravanning accessories go it’s not a lot of money and a very sensible addition if you already have the Patriot/3000 Router Kit. Be mindful that it’s more susceptible to strong winds so ensure mountings are secure. It’s worth pointing out though that if you are already picking up a strong signal on the omnidirectional antenna – using this is unlikely to speed up your connection.  For weak signals though, it will make the difference between being online and off. For for details and to buy direct from Solwise click HERE.


The second product we looked at was the Outdoor USB Panel AntennaDB-86WUUMAAAnSB

This is different to the above product in that it is a complete unit connecting directly to a 20170727_200230 (2)computer or router via the attached 5 meter USB cable. If connecting to a computer drivers will need to be installed from the enclosed CD. If pairing with the router that is included with the Patriot/3000 Kit no driver installation is necessary.

The unit comes with a couple of stout jubilee clips but you will need something to attach it to. We used the Vision Plus Multi Mast which provides a couple of fixing options to your ‘van. The jubilee clips were a little large so I used a couple of thick cable ties to attach the unit to the mast.

Aligning to get the best possible signal is the same as above. However, using the Vision Plus Multi-Mast as we did you don’t need to stretch to reach the unit itself. It can be aligned by undoing the retaining nut at the bottom of the mast and rotating as required to achieve the optimum signal.

20170727_200215Again, it got us online when the omnidirectional aerial couldn't and with a gain of 12dBi it’s slightly more powerful than the one reviewed above and on one on site it improved the stability of a very weak WiFi signal further. At a little over forty pounds it is just under double the cost and there is no fixing kit – the Multi-Mast we used is available for around twenty pounds from Vision Plus.

So, is it worth it? Well, if you already have the Solwise Patriot/3000 router kit then perhaps the first antenna will be a better purchase. However, the router in that kit is available separately, so if you haven't bought the kit, you may want to consider pairing this with the router – don’t forget you will need something to mount it on though.

So, another couple of great products from Solwise. Yes, I was given them to review but I wouldn’t recommend them if I didn’t think they were worth it. These, together with our original Solwise kit have kept us online all summer and I’m sure will continue to do so.


Solwise - More WiFi options.

Many of you have read my review of the Solwise WiFi Booster Kit back in April. In fact given Trev the  Portly Partners’ enthusiastic activity on social media I would be surprised if you missed it! It’s been one of most popular reviews and a most useful bit of kit too. I wish I’d bought one ages ago instead of waiting for the opportunity to review one. It’s already saved us plenty in WiFi costs and I expect that will continue throughout the summer.

Talking of the summer I am excited to have the chance to evaluate two more products from Solwise, both of which are designed to pick up even weaker signals than even the impressive kit we reviewed. They do the same thing but what they can do it with differs, so lets take a look.

First up is the Outdoor USB Panel Antenna

DB-86WUUMAAAnSBThis connects to your computer or suitable router via USB like the Patriot that was in the kit we reviewed. A driver and utility disk is included but this won’t be needed if it’s paired directly with the Solwise router. Two jubilee clips are included for mounting on a suitable mast but I’m thinking that stout cable ties might be as effective. I have already bought his Vision Plus mast to give more height to our existing kit and the antenna should fix to that just fine.

This is a directional antenna so to perform to it’s potential it needs to be aligned correctly. Rotating the unit on the mast with semi-tight cable ties may be the way to go and I’m looking at ways to make alignment easier and avoid the sort of faffing associated  trying to align a satellite dish manually for example. I’m sure many have seen that carry on on site!

I’ve already had a play with this at home and whilst the environment is completely different to it’s intended use the results gave a clear indication of it’s potential once on site. First though I’ll explain my set up at home to put the results in to context.

My router – a BT Hub Version 4 - sits in the lounge of our flat and in the same room Speedtest.net reports speeds of anything up to 72 Mbps download through Wi-Fi. 

My laptop is situated in the ‘office’ also known as the dining room, spare room, Legs Down HQ and caravan paraphernalia storage area! It's two rooms down along the hall from the lounge and there I can expect around 8-12 Mbps download. Nothing like the speeds several walls and a few metres away in the lounge but still something many could only dream of!

With the antenna connected via USB and driver installed results were certainly interesting. Having the antenna laying flat on it’s back on the floor made little difference to download speed. However, positioning the unit upright and directing in roughly towards the BT router speeds improved to 28 Mbps. Up to three times faster than without. Three  minor adjustments to the antennas direction brought speeds progressively up to 32 Mbps – and this was still through several brick walls.

Now, as I said this in no way simulating it’s intended use but it does show two things – it’s potential power in picking up weak signals and the importance of correct alignment to achieve the best results. I’m very much looking forward to trying this out on site and paired with the Solwise router that we already have as part of the kit reviewed in April.

In addition we will also be looking at the Outdoor Panel Antenna.

net-wl-ant010pn-1WP_20170331_13_03_34_ProThis has an N-type connector and a bracket at the rear for wall mounting if you wish. For those of us that already have the kit that I reviewed however, this can directly replace the omnidirectional unit included in that kit – shown here in action.

Again, this device though is directional – so to work correctly and pick up weaker signals it needs to be aligned accurately. And again, I will be looking at ways to make this easier.

We will be having a thorough look at both devices throughout the summer with a written and hopefully video review to follow.

For those of you that have read enough and are already interested, the USB Panel Antenna is available for a little over £40 HERE. If you have the Patriot Wi-Fi Booster Kit then the Outdoor Panel Antenna is an excellent value upgrade at a little over £20 and you can see that HERE.

My review of the Patriot Wi-Fi Booster Kit can be found HERE and the accompanying video HERE

Solwise Mobile Internet Solution

Following on from our review of the excellent Wi-Fi booster system from Solwise, we were given the opportunity to evaluate some more tech – this time to get you connected via mobile networks when Wi-Fi isn’t available.
It’s high end – and not cheap - and we agreed that it would be of limited interest to many caravanners. However, following a few explorative posts in social media, a few of you did express an interest, so I’m going to give an outline of what it is, what it does and why it might be useful.
Like the Wi-Fi booster system the kit is formed of two separately available  components – the first of which is the router. We’ll look at that first.
WP_20170511_10_14_34_ProWP_20170519_09_36_25_Pro
On the back there are four aerial connection points. Two are for receiving the mobile signal and indoor aerials are supplied or you can connect an external one if required. The other two are for transmitting the Wi-Fi signal to your devices. There are network ports to for devices that do not have Wi-Fi capability.
Behind the back panel are slots for two standard size SIM cards for the networks of your preference.
Set up was straightforward and I found that many of the default settings for your chosen network provider can be used. Like the WiFi system we looked at, you are urged to secure (and rename) the WiFi network that the device transmits.
There are a vast array of options for the more technically minded such as setting up an additional network – perhaps to share with friends. The use of the SIM cards can be configured in a number of ways – swapping from one to another if (when!) one network falls over or when a preset data limit is reached.
It is without doubt an exceptionally powerful and versatile device. See the link to the product on the Solwise website below:
As stated, the router can be used as a standalone device, but to get (and stay) connected in poor signal areas an external antenna is available. The antenna is omnidirectional so can be placed anywhere but height will help and a knowledge of where the mobile signal transmitter is will help in positioning the unit on the right side of the building and making the most of the available signal. Two five metre leads with connectors are included and both must be connected to enjoy the speed of 4G – more accurately called LTE.
WP_20170511_10_14_44_ProWP_20170519_09_37_10_Pro
The antenna wont just work with the above router though. Many mobile Wi-Fi adapters like those from Huawei have sockets for connecting an external antenna – often hidden behind a flap on the edge of the unit. With suitable adaptors this will work with such devices and may be a great solution if you rely on a mobile network to get connected but frequently come across poor signal strength. A variety of both temporary and permanent fixing options are included. This may be a solution for anyone that wants to get connected on their seasonal pitch or holiday home when Wi-Fi isn't available.
Check the link below for more details:


Product Review - Solwise WiFi Booster Kit

How you get connected when away camping broadly falls into two categories. One is using the mobile network - either with your 'phone's Wifi hotspot facility or a dedicated mobile Wi-Fi adaptor.

The other is on site or locally available Wi-Fi - and that's where our latest review product comes in.

WP_20170331_10_55_41_ProWP_20170331_10_55_52_Pro

There are two main components to the Solwise kit we are looking at, both of which play an important part in making this a very useful piece of kit.WP_20170331_13_03_34_Pro

WP_20170331_13_02_20_ProFirstly, the aerial. It sits outside your unit, so any available signal is not shielded by the walls, and is very powerful allowing you to pick up signals not normally reachable by a pad or laptop.

Secondly, the router box. This sits inside  and is connected to the aerial via a USB cable. The router creates it's own WiFi signal allowing multiple devices to connect to it, effectively sharing one connection. This is particularly useful for devices that don't have a normal USB connection or where you don't want to be tethered to a cable.

Right, getting it up! A  number of fitting options are provided in the kit including u-bolts for mouting to a TV aerial mast or similar, jubilee clips and suction pads for affixing to the side of your unit - and that's what we used. There is a waterproof seal at the bottom of the unit where the cable exits and provided theunit is mounted vertically, the supplied waterproof tape is not required.

Inside, there a couple of connections to make - the USB cable from the aerial to the router - and the router's power supply. Both mains and 12v adaptors are provided so you can stay online when off grid.

Comprehensive instructions are provided on how to set up the router through any web browser - and this can be done on any smartphone, laptop or pad with a WiFi facility - so pretty much anything!

Initial set up consists of these stages:

  1. Connecting to the router so you can access the router's set up screen - search as you would for any WiFi network.
  2. Access the router's set up screen through a browser
  3. Search for an available WiFi network and connect to it.
  4. Personalise and secure your own internal WiFi hotspot.

Now, that may all seem a bit of a faff. BUT, steps 1, 2 & 4 only need to be done once. When you go to another site you simply go through stage 3 again to find available networks and connect to one.

It sounds more involved than it is and if you've set up your home router you will have no problem with this.

So, you might be thinking, all very interesting but why bother? Again, there are two main reasons:

  1. The powerful aerial can pick up WiFi that your device may not be able to. Maybe you are at the far end of the campsite, or Wi-Fi is only available around the reception area for example. Or there may be no WiFi on site but you may be able to pick up some local WiFi with this - perhaps from a pub or BT WiFi - access to which is free if you are a BT customer.
  2. The router allows multiple devices to access one connection. Often site Wifi is limited to a single device either by a password or voucher system perhaps. Some even stop you logging out so you can't transfer usage to another device - we had this recently and it's a bit sneaky. In this case it would be your router that is connected. Your devices connect to the router. Imagine the potential cost saving for a family of four, all with devices to connect.

In the week or so that we've been using this we have found it invaluable. At our recent Twittercamp meet, five units were able to share one connection - one was even able to use a Now TV box thanks to the strength and stability of the signal. On our current site, my laptop struggles to pick up the site WiFi on it's own, but through the aerial and router it's fine - I've even been able to upload the video that will accompany this blog. It's very quickly become an essential part of our caravanning kit as bloggers and I wouldn't be without it now.

Thank you to Solwise for supplying the kit. We have put together a video to accompany the blog which you will find on our YouTube channel HERE

If you have any questions at all please do not hesitate to ask. If I can't answer them myself, I will try and get an answer for you or steer you in the right direction.

The kit is available direct or from Amazon HERE.